MUHAMMAD ANIFF BIN OTHMAN (02DEE172022)

Electrical safety
Electricity can kill or severely injure people and cause damage to property. However, you can take simple precautions when working with or near electricity and electrical equipment to significantly reduce the risk of injury to you, your workers and others around you. This section provides a summary of those precautions.
Grounded in Safety: Preventing Electrical Catastrophes
To ensure a relatively smooth operation in mission-critical facilities like data centers and 9-1-1 operations, exceeding the minimal requirements of the National Electrical Code is essential, says David Brender, the national program manager for electrical applications at the Copper Development Association.
Overloads in an electrical system are hazardous because they can produce heat or arcing. Wires and other components in an electrical system or circuit have a maximum amount of current they can carry safely. If too many devices are plugged into a circuit, the electrical current will heat the wires to a very high temperature. If any one tool uses too much current, the wires will heat up.
The temperature of the wires can be high enough to cause a fire. If their insulation melts, arcing may occur. Arcing can cause a fire in the area where the overload exists, even inside a wall.
In order to prevent too much current in a circuit, a circuit breaker or fuse is placed in the circuit. If there is too much current in the circuit, the breaker “trips” and opens like a switch. If an overloaded circuit is equipped with a fuse, an internal part of the fuse melts, opening the circuit. Both breakers and fuses do the same thing: open the circuit to shut off the electrical current.
If the breakers or fuses are too big for the wires they are supposed to protect, an overload in the circuit will not be detected and the current will not be shut off. Overloading leads to overheating of circuit components (including wires) and may cause a fire. You need to recognize that a circuit with improper overcurrent protection devices—or one with no overcurrent protection devices at all—is a hazard.
Overcurrent protection devices are built into the wiring of some electric motors, tools, and electronic devices. For example, if a tool draws too much current or if it overheats, the current will be shut off from within the device itself. Damaged tools can overheat and cause a fire. You need to recognize that a damaged tool is a hazard.
Wet conditions hazards
Working in wet conditions is hazardous because you may become an easy path for electrical current. If you touch a live wire or other electrical component—and you are well-grounded because you are standing in even a small puddle of water—you will receive a shock.
Damaged insulation, equipment, or tools can expose you to live electrical parts. A damaged tool may not be grounded properly, so the housing of the tool may be energized, causing you to receive a shock. Improperly grounded metal switch plates and ceiling lights are especially hazardous in wet conditions. If you touch a live electrical component with an uninsulated hand tool, you are more likely to receive a shock when standing in water.
But remember: you don’t have to be standing in water to be electrocuted. Wet clothing, high humidity, and perspiration also increase your chances of being electrocuted. You need to recognize that all wet conditions are hazards.
Electric Fire Prevention Measures
Although the chances of an electric fire occurring is not high, once the accident occurs there is a high chance that the disaster will result in casualties and property damage. Sufficient preparation must be done because electric fires happen in the blink of an eye -once the accident is detected it is usually too late.
Measures for Electrical Appliances
<Electrical Appliance Wiring>| Prohibition of Cord Connecting | Try to keep electric cords as short as possible. When extending the cord be sure to use a cord connecter instead of twisting separate wires together based on one’s own discretion. |
|---|---|
| Prohibition of the use of Stationary Cords | There are cases of cords short-circuiting or becoming crushed or bent causing the wire to snap and break when the cord is nailed or stapled for stationary use. Sparks caused from this short-circuiting may cause ignition, therefore, the stationary use of cords by nailing/stapling must be prohibited. |
| Use of Appropriate Wire Thickness | Wires for electrical appliances must be the appropriate thickness taking into account the capacity of the appliance. Using a single cord for multiple appliances should also be prohibited. |
Use old wiring appliances within the standard regulation limits. Unfavorable conditions can ensue when wiring connections and contact points overheat, therefore the following precautionary measures must be followed.
- The condition of the fastener section or contact surface of the switch wiring.
- Use of appropriate fuse capacity.
- Contact condition and handling methods of the outlet and plug.
* When using multiple outlets, it is prohibited to plug in several appliances to a single outlet. Safely plug in appliances so that faulty connections do not cause overheating.
Preventive measures in electrical safety

I. Protection against Direct Contact
BS 7671 Provides
1. Insulation of live parts
The insulation is intended to prevent any contact with live parts.
NOTE 1:
- Live parts shall be completely covered with insulation, which can only be removed by destruction.
- For factory-built equipment, the insulation shall comply with the relevant Saudi Standards for the electrical equipment.
- For other equipment, protection shall be provided by insulation capable of durably withstanding the stresses to which it may be subjected in service such as mechanical, chemical, electrical and thermal influences.
- Paints, varnishes, lacquers and similar products alone are generally not considered to provide adequate insulation for protection against electric shock in normal service.
NOTE 2:
- Where insulation is applied during the erection of the installation, the quality of the insulation should be confirmed by tests similar to those, which ensure the quality of insulation of similar factory-built equipment.
2. Barriers or enclosures
Barriers or enclosures are intended to prevent any contact with live parts.
3. Obstacles
Obstacles are intended to prevent unintentional contact with live parts but not intentional contact by deliberate circumvention of the obstacle.
4. Placing out of reach
Protection by placing out of reach is intended only to prevent unintentional contact.
5. Additional protection by RCD’s
The use of residual current devices (RCDs) with a rated operating residual current not exceeding 30 mA, is recognized as additional protection in case of direct contact in the event of failure of other measures of protection or carelessness by users.
II. Protection against direct contact
BS 7671 provides
Persons and livestock shall be protected against dangers that may arise from contact with exposed-conductive-parts in case of a fault. This protection can be achieved by one of the following methods:
1. Preventing a fault current from passing through the body of any person or any livestock;
2. Limiting the fault current which can pass through a body to a value lower than the shock current;
3. Automatic disconnection of the supply in a determined time on the occurrence of a fault likely to cause a current to flow through a body in contact with exposed-conductive-parts, where the value of that current is equal to or greater than the shock current.
Indirect contact protection
There are three methods of providing protection from shock after contact with a conductor which would not normally be live:
1. - making sure that when a fault occurs and makes the parts live, it results in the supply being cut off within a safe time. In practice, this involves limitation of earth fault loop impedance, a subject dealt with in greater detail in {5.3}.
2. - cutting off the supply before a fatal shock can be received using a residual current device {5.9}.
3. - applying local supplementary equipotential bonding which will ensure that the resistance between parts which can be touched simultaneously is so low that it is impossible for a dangerous potential difference to exist between them. It is important to stress that whilst this course of action will eliminate the danger of indirect contact, it will still be necessary to provide disconnection of the supply to guard against other faults, such as overheating.
It is important to appreciate that in some cases a dangerous voltage may be maintained if an un-interruptible power supply (UPS) or a standby generator with automatic starting is in use.
Safe Working Environment
Lockout/Tag out
Lockout is defined in the Canadian standard CSA Z460-13 "Control of Hazardous Energy - Lockout and Other Methods" as the "placement of a lockout device on an energy-isolating device in accordance with an established procedure." A lockout device is "a mechanical means of locking that uses an individually keyed lock to secure an energy-isolating device in a position that prevents energization of a machine, equipment, or a process."
Lockout is one way to control hazardous energy. See the OSH Answers Hazardous Energy Control Programs for a description of the types of hazardous energy, and steps required in a control program.
In practice, lockout is the isolation of energy from the system (a machine, equipment, or process) which physically locks the system in a safe mode. The energy-isolating device can be a manually operated disconnect switch, a circuit breaker, a line valve, or a block (Note: push buttons, selection switches and other circuit control switches are not considered energy-isolating devices). In most cases, these devices will have loops or tabs which can be locked to a stationary item in a safe position (de-energized position). The locking device (or lockout device) can be any device that has the ability to secure the energy-isolating device in a safe position. See the example of the lock and hasp combination in Figure 1 below.
Tag out is a labelling process that is always used when lockout is required. The process of tagging out a system involves attaching or using an information tag or indicator (usually a standardized label) that includes the following information:
- Why the lockout/tag out is required (repair, maintenance, etc.).
- Time of application of the lock/tag.
- The name of the authorized person who attached the tag and lock to the system.
Note: ONLY the authorized individual who placed the lock and tag onto the system is the one who is permitted to remove them. This procedure helps make sure the system cannot be started up without the authorized individual's knowledge.
Equipment
Lockout and tag out processes involve more than putting a lock on a switch. They are comprehensive step-by-step processes that involve communication, coordination, and training.
Please note the following definitions from CSA Z460-13:
Affected person - persons who are not directly involved in the work requiring the hazardous energy control, but who are (or may be) located in the work area.Authorized person - a person who is qualified to engage in hazardous energy control because of knowledge, training, and experience and has been assigned to engage in such control.
Steps of a lockout/tag out program include:
1. Prepare for shutdown
The authorized person will identify which sources of energy are present and must be controlled; and more importantly, identify what method of control will be used. This step involves completing sets of specific work instructions that outline what controls and practices are needed to lock and tag out a system before performing any activity.
2. Notify all affected employees
The authorized person will communicate the following information to notify affected persons:
- What is going to be locked/tagged out.
- Why it is going to be locked/tagged out.
- For approximately how long will the system be unavailable.
- Who is responsible for the lockout/tag out.
- Who to contact for more information.
3. Equipment Shutdown
If the system is operating it should be shutdown in its normal manner. Use manufacturer instructions or in-house work instructions. Equipment shutdown involves ensuring controls are in the off position, and verifying that all moving parts such as flywheels, gears, and spindles have come to a complete stop.
4. Isolation of system from hazardous energy
The exact written instructions will be specific to that system in the workplace. In general, the following procedures are used:
- Electrical energy - Switch electrical disconnects to the off position. Visually verify that the breaker connections are in the off position. Lock the disconnects into the off position.
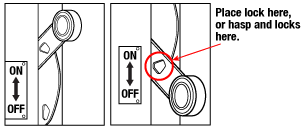
Figure 1: Electrical lockout
- Hydraulic and Pneumatic potential energy - Set the valves in the closed position and lock them into place. Bleed off the energy by opening the pressure relief valves, then closing the airlines.
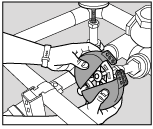
Figure 2: Hydraulic and Pneumatic lockout
- Mechanical potential energy - carefully release energy from springs that may still be compressed. If this is not feasible, block the parts that may move if there is a possibility that the spring can transfer energy to it.
- Gravitational potential energy - Use a safety block or pin to prevent the part of the system that may fall or move.
- Chemical energy - locate chemical supply lines to the system and close and lockout the valves. Where possible, bleed lines and/or cap ends to remove chemicals from the system.
5. Dissipation (removal) of residual or stored energy
In general, examples include:
- Electrical energy - To find a specific method to discharge a capacitor for the system in question, contact the manufacturer for guidance. Many systems with electrical components, motors, or switch gears contain capacitors. Capacitors store electrical energy. In some cases, capacitors hold a charge and may release energy very rapidly (e.g., similar to the flash of a camera). In other cases, capacitors are used to remove spikes and surges in order to protect other electrical components. Capacitors must be discharged in the lockout process in order to protect workers from electrical shock.
- Hydraulic and Pneumatic potential energy - Setting the valves in the closed position and locking them into place only isolates the lines from more energy entering the system. In most cases, there will still be residual energy left in the lines as pressurized fluid. This residual energy can be removed by bleeding the lines through pressure relief valves. Verify depressurization or use flange-breaking techniques. Contact the manufacturer for more specific details, or if no pressure relief valves are available, what other methods are available.
- Mechanical potential energy - Carefully release energy from springs that may still be compressed. If this is not possible, use blocks to hold the parts that may move if the energy is released.
- Gravitational potential energy - If feasible, lower the part to a height where falling is impossible. If this is not possible, contact the manufacturer for guidance.
- Chemical energy - If available, bleed lines and/or cap ends to remove chemicals from the system.
6. Lockout/Tag out
When the system's energy sources are locked out, there are specific guidelines that must be followed to make sure that the lock cannot be removed, and the system cannot be inadvertently operated. These guidelines include:
- Each lock should only have one key (no master keys are allowed).
- There should be as many locks on the system as there are people working on it. For example, if a maintenance job requires 3 workers, then 3 locks should be present - each of the individuals should place their OWN lock on the system. Locks can only be removed by those who installed them, and should only be removed using a specific process - see step 9 below.
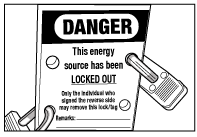
Figure 3: Example of multiple locks on a lockout tag
7. Verify Isolation
Verify that the system is properly locked out before beginning any work. Verification can take place in several ways:
- The machine, equipment, or process controls (push buttons, switches, etc.) are engaged or activated and the result is observed. No response means isolation is verified. Return controls to the safe position (off).
- Visual inspection of:
- Electrical connections to make sure they are open.
- Suspended parts are lowered to a resting position or blocked to prevent movement.
- Other devices that restrain machine or process movement.
- Valve positioning for double block and bleed (for pipes or ducts) - closing two valves of a section of a line, and then bleeding (or venting) the section of the line between the two closed valves.
- Presence of solid plate used to absolutely close a line - called line blanking (for pipes or ducts).
- Any other acceptable method of energy isolation.
- Testing of the equipment:
- Test circuitry (should be done by a certified electrician) - note: equipment with capacitors needs to be cycled until all energy is drained.
- Check pressure gauges to make sure hydraulic and pneumatic potential energy has been removed.
- Check temperature gauges to make sure thermal energy has been discharged.
Choose the method that will best make sure that the energy to the system has been isolated without creating other hazards during the verification.
8. Perform Maintenance or Service Activity
Complete the activity that required the lockout process to be started.
9. Remove Lockout/Tag out devices
To remove locks and tags from a system that is now ready to be put back into service, the following general procedure can be used:
- Inspect the work area to make sure all tools and items have been removed.
- Confirm that all employees and persons are safely located away from hazardous areas.
- Verify that controls are in a neutral position.
- Remove devices and re-energize machine.
- Notify affected employees that servicing is completed.
*Note - it is good practice to make sure any individual who placed a lock on the system should also be present when the system is re-started. This practice helps make sure those employees working on the system are not in a hazardous area when the machine is restarted.
Overload wiring by using the right size and type of wire.
Wire is sized by the American Wire Gauge (AWG) system. What wire size and circuit size is proper for your installation is determined by several factors, including the planned load on the circuit, the number of outlets or light fixtures, and the length of the circuit. What is critical, though, is that the wire gauge matches the circuit breaker size.
If you've shopped for electrical wire, you have likely noticed that there are many types and sizes of wire to choose from. Different types of wire are intended for different uses, but with any of these wire types, knowing the right wire size is key to a safe and effective wire choice. For a summary of what the different wire designations are and their usage, see this article on interpreting the letter designations printed on electrical wiring.
Wire Gauges and Uses
| Wire Use | Rated Ampacity | Wire Gauge |
| Low-voltage Lighting and Lamp Cords | 10 Amps | 18 Gauge |
| Extension Cords | 13 Amps | 16 Gauge |
| Light Fixtures, Lamps, Lighting Runs | 15 Amps | 14 Gauge |
| Receptacles, 110-volt Air Conditioners, Sump Pumps, Kitchen Appliances | 20 Amps | 12 Gauge |
| Electric Clothes Dryers, 220-volt Window Air Conditioners, Built-in Ovens, Electric Water Heaters | 30 Amps | 10 Gauge |
| Cook Tops | 45 Amps | 8 Gauge |
| Electric Furnaces, Large Electric Heaters | 60 Amps | 6 Gauge |
| Electric Furnaces, Large Electric Water Heaters, Sub Panels | 80 Amps | 4 Gauge |
| Service Panels, Sub Panels | 100 Amps | 2 Gauge |
| Service Entrance | 150 Amps | 1/0 Gauge |
| Service Entrance | 200 Amps | 2/0 Gauge |
Comments
Post a Comment